Free knitting pattern: Mini Patterned Easter Egg Decorations
- wombleknits
- Mar 20, 2022
- 6 min read
Updated: Feb 4, 2024
Updated 4 February 2024
Looking for easy Easter crafts, specifically a knitting pattern for Easter Eggs? Then look no further!
This free Easter egg knitting pattern provides comprehensive instructions to enable you to make your own stuffed Easter egg ornaments. What's more, these are infinitely reusable decorations you can bring out year after year - a far more sustainable (and less fattening!) option than chocolate eggs with all their single use packaging.

ABOUT THIS PATTERN
This is a free pattern for mini knitted Easter eggs, with optional decorative variations around the middle section.

These eggs come out slightly smaller than a hen's egg and make great chocolate-free Easter egg alternatives, or can be threaded with a ribbon to make hanging Easter egg tree decorations.
Each egg starts and finishes the same, but there are a variety of options for the 'flat' section in the middle between the increases and decreases. These are presented as coloured charts for ease.
NOTE: the whole pattern for three sizes of eggs was available completely free of charge in some form or another from March 2019 to February 2024, but it's a pattern that took an awful lot of work and I can no longer afford not to charge for it. Therefore, only the small egg size is now available here in my blog and only in its original form; to access the larger sizes, updated patterns and instructions for knitting the eggs flat, you will need to purchase the pattern on either Ravelry, Etsy, or LoveCrafts.
Purchasing the pattern will give you not only two larger sizes (with the corresponding middle section pattern charts) but also:
Alternative instructions for knitting the eggs flat on two needles
Slightly adjusted patterns for better shaping
Tips on how to make zero waste Easter eggs using natural or recycled materials
Formatted for easy printing.


You can also buy the pattern ready printed to be posted out to you - great if you don't have a colour printer to print all those lovely colourful charts!

Or for the really easy option, I provide a ready-to-knit kit (including pattern, sustainable Eucalyptus yarn and wooden eggs plus optional needles) for Eco Easter Eggs in my Etsy store.
Mini Patterned Easter Egg Decorations - knitting pattern
MATERIALS
Yarn: a few grams of DK yarn (around 3 to 6 g per small egg)
Gauge: 25 st / 32 rows to 10cm / 4"
Needle size: US 3 / UK 10 / 3.25mm
Needle type:
double pointed needles; or
circular needle at least 23" / 60cm long (for magic loop) ; and
tapestry needle
Notions:
toy stuffing; or
small polystyrene egg (5cm / 2" long; 9cm / 3.5" circumference)
SPECIFICATIONS
Finished size: 5cm / 2" long; 10.5cm / 4.25" circumference (slightly bigger if using toy stuffing)
Time required: ½ to 1 hour per egg
Difficulty: advanced beginner to medium – knitting a small circumference in the round, plus optional colourwork
TIPS
There are a lot of different ways to personalise this pattern, for example:
Use the charts to make patterns by using purl stitches instead of a different colour
Add lettering in chain stitch (use thinner wool or separate out a strand or two of DK for this)
Or for the easiest pattern of all, use a self-striping yarn!
Make your eggs larger or smaller by using thicker or thinner yarn (you can also vary the size a little by over- or under-stuffing the eggs)
You may also like to try steam blocking your egg prior to stuffing, which can help to even out the colourwork.
NOTES
All knitting is in the round on magic loop or double-pointed needles, in stocking stitch, i.e. all rows knitted, except where explicitly stated.
Stuffing
Filling with a solid egg gives a far better, defined shape than toy stuffing, but it can be a little tricky knitting around the top of it. It helps to pull up your knitting as far as you can, and after a couple of rows it should get easier. You may also find it easier to switch to circular needles with shorter straight sections, or double pointed needles.
Sewing in ends
Don't be tempted to just tie off or leave your yarn ends, just because they're going to be hidden inside the egg. You'll get a much, much neater pattern if you sew them in properly!
Increases and decreases
In each increase or decrease row you will need to increase or decrease by six stitches. It may help to think of the egg as having six vertical segments to it (like lines of longitude on a globe) and therefore in each increase or decrease row you will need to work one increase or decrease in each segment.
I find this easiest to do this at the start of each segment, but this does result in very definite 'seam' lines going up the egg (see turquoise egg below). If you're happy with this, fine! If you prefer it to look more even, it's best to do the increases at different points across the segment for each increase or increase row, even if it's just as basic as start of each segment for one row, then middle of each segment for the next (see pink egg below). The same goes for the decreases in the top section of the egg.
Which increase stitch?
You can use any increase you like. Right lifted increase is probably the least noticeable, but I do find it very fiddly on tiny, tight stitches like these, especially on the first few rows. I personally find knitting front and back a lot easier, but it does leave a little purl-like bar. See below for notes on how to create these stitches.


INCREASE AND DECREASE STITCH INSTRUCTIONS
Right lifted increase (RLI) – insert tip of right needle under the back/right arm of the stitch below the next stitch on the left needle and lift that stitch up onto the end of the left hand needle. Knit the lifted stitch and then the stich that was above it (increases 1 stitch).
Knit front & back (KFB) – knit into the front of the stitch then knit purl-wise into the back of it as well before pulling it off the left needle (increases 1 stitch)
Knit two together (K2tog) – knit two stitches together (decreases 1 stitch)
PATTERN INSTRUCTIONS

SMALL EGG PATTERN
Bottom section (increases)
Cast on 6, divide onto DPNs/magic loop and join in the round
Row 1: Knit, increasing 6, i.e. in every stitch (12 st) (giving you 2 st per segment)
Row 2: Knit
Row 3: Knit, increasing 6 (18 st) (3 st per segment)
Row 4: Knit
Row 5: Knit, increasing 6 (24 st) (4 st per segment)
Row 6: Knit
Middle section (add pattern or stripes if desired – see charts below)
Rows 7-13: Knit 7 rows
Top section (decreases)
Row 14: Knit, decreasing 6 (18 st) (3 st per segment)
Rows 15-16: Knit 2 rows
Row 17: Knit, decreasing 6 (12 st) (2 st per segment)
Rows 18-19: Knit 2 rows
Pause to sew in any ends (especially from other colours in middle section pattern band) and stuff the egg.
Row 20: Knit, decreasing 6, K2tog on every stitch (6 st)
Cut yarn and pull tail through stitches, gather up tight and sew in the loose end.
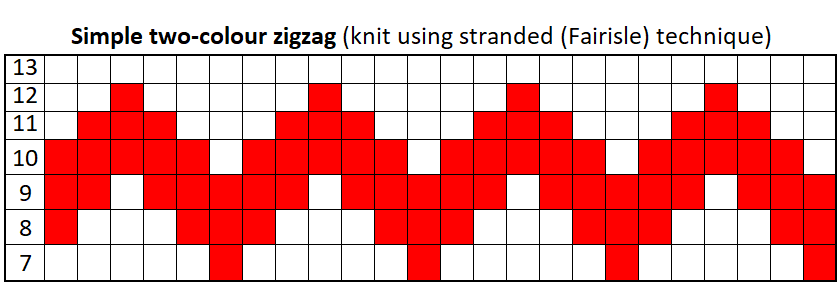
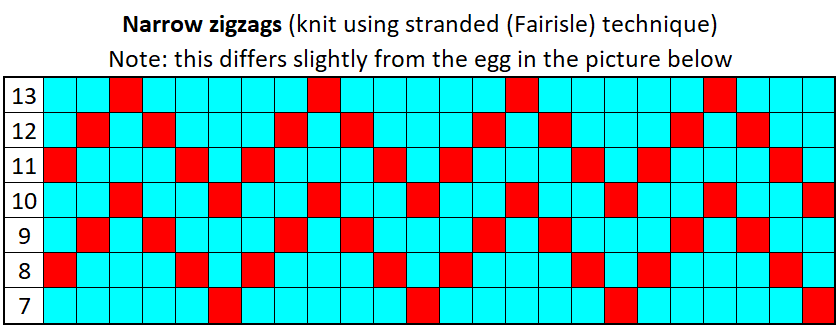
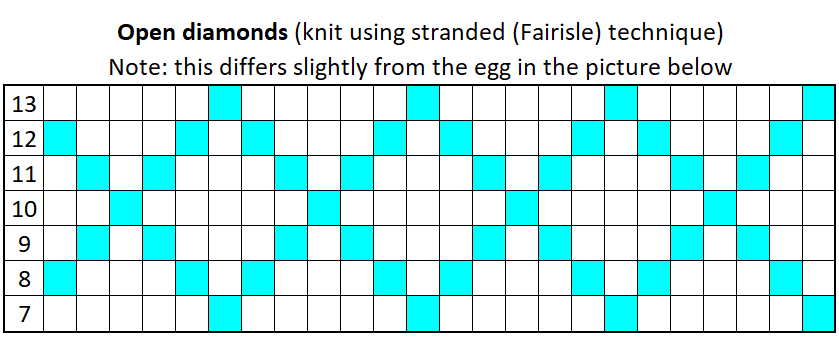
SMALL EGG MIDDLE SECTION CHARTS
All charts below are for the whole width of the egg (24 stitches). On all charts, begin at the bottom and knit from right to left, i.e. as if you're looking at the knitting.


Don't forget, you can buy the full version of this pattern on Etsy, Ravelry, and LoveCrafts, giving you:
Larger egg sizes
Slightly adjusted patterns for better shaping
New instructions to knit your eggs flat on straight needles as well as in the round
Tips on eco-conscious choices when making your knitted eggs
Or you can take the easy option for knitting a set of medium sized eggs by purchasing pattern, eggs, needles and the exact amount of yarn you need with my Eco Easter Eggs kit!
However you choose to knit them, have fun making your Easter egg decorations, and please do share them on social media, tagging @wombleknits! As a designer, there's nothing better than seeing what people have made with my designs!
If you enjoyed this free Easter Egg Knitting Pattern, check out www.wombleknits.com for more easy, sustainable knitting patterns.
Or sign up for my newsletter to be the first to hear about my newest products and patterns!
Questions? Issues? Let me know in the comments below. I'm always happy to help!
Anna


Comments